All Posts By

Nick Ford

Lessons

Nick’s Practice Tips: Listen to the music you wish to learn

This post is a friendly reminder to use your ears and listen to the music you want to learn!

This is going to seem like a no-brainer to some, but as a professional guitar teacher I can tell you that it isn’t second nature for some people learning the guitar to listen to the music that they are currently learning. I see this a lot with kids and teenagers, sometimes adults, and even the occasional band member. They simply read the example or look up a tab, but don’t spend enough (or any) time listening and internalizing the music. I often half-jokingly tell my students when talking about listening to the music they’re learning, “YouTube exists. No excuses.” With the advent of the internet, pretty much any song you want to learn is available to listen to, most of the time for free! Here are 6 ways to improve your listening and learning experience.

  • Listen to the point where you can anticipate every section of the song. If you want to play a song in it’s entirety, it is crucial to listen to the song until you are really familiar with how it goes and can anticipate each section as it comes. You also want to be able to anticipate specific riffs, chord progressions, solos, and melodies that you have to play.
  • Active vs. Passive Listening: Whenever I have to learn a piece of music, I listen to it two ways. I’ll put in on in the background when I’m cooking, working, or when I’m driving. This is passive listening. Many times this can help you familiarize yourself with the music generally. At some point, I will make sure to listen actively. This means that your entire focus is listening to this piece. No multitasking allowed here! This gives you a chance to really get absorbed in a piece of music and internalize it. You will notice more subtle nuances as well, which can be vital to playing certain things correctly.
  • Listen with headphones or on good speakers. Listening on a phone is ok, but you may miss a crucial part of the piece like a guitar harmony that isn’t mixed loudly or especially the bass.
  • Listen over the course of time. Your ear will improve over time with practice, and you will likely hear more. As you are learning a piece, be sure to listen to it every day until you feel that you really know it. Over the course of time, this will happen naturally, and you’ll know when you reach this point when you can hum and/or sing the parts of the song.
  • Revisit pieces of music you already know. A quick listen may reveal something you missed before that you can now add! If you are continually improving, you will likely catch things now that you didn’t before.
  • Slow down fast or tricky passages, rhythms, and sections with a software or a website that does this. Capo and Transcribe are both fantastic programs that do this, and you can even slow down videos on YouTube. Again… no excuses!

This seems like a very simple idea. Listen to the music you want to learn. In our hectic, fast-paced, low-attention span world, this can be tricky sometimes. Take a breath, slow down, and listen to some of your favorite music. At the very least, listen passively, have it on in the background. If it’s really something you want or need to master, then take the necessary time to listen intently.

Try these steps the next time you need to learn a piece of music. They will definitely help you on your musical journey and goals, whatever they may be. Happy practicing and happy listening!

 

Lessons, Music Theory

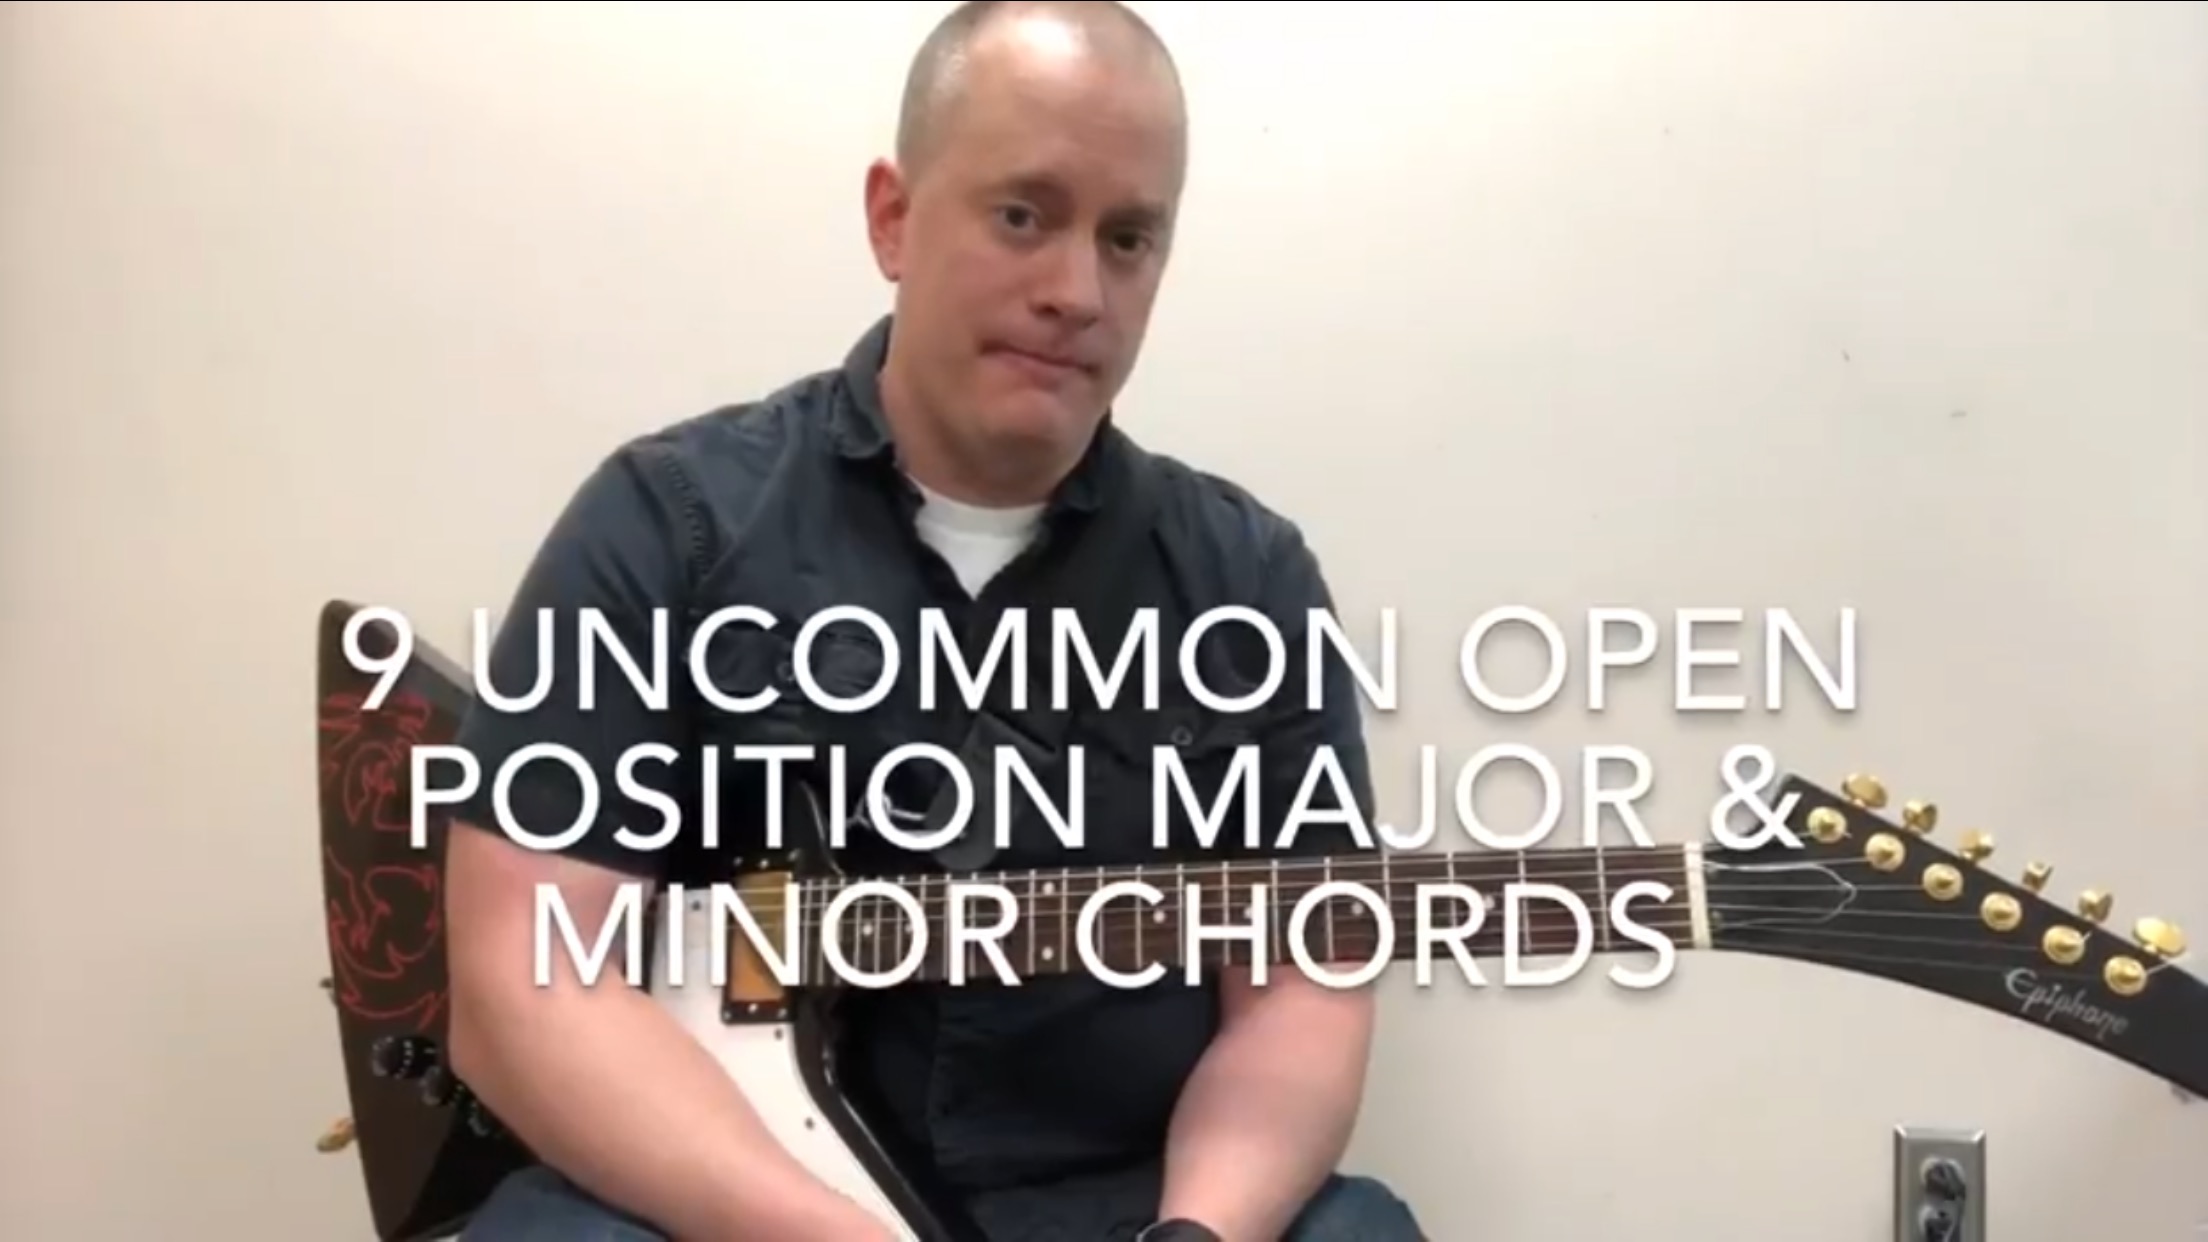
9 Uncommon Open Position Major and Minor Chords

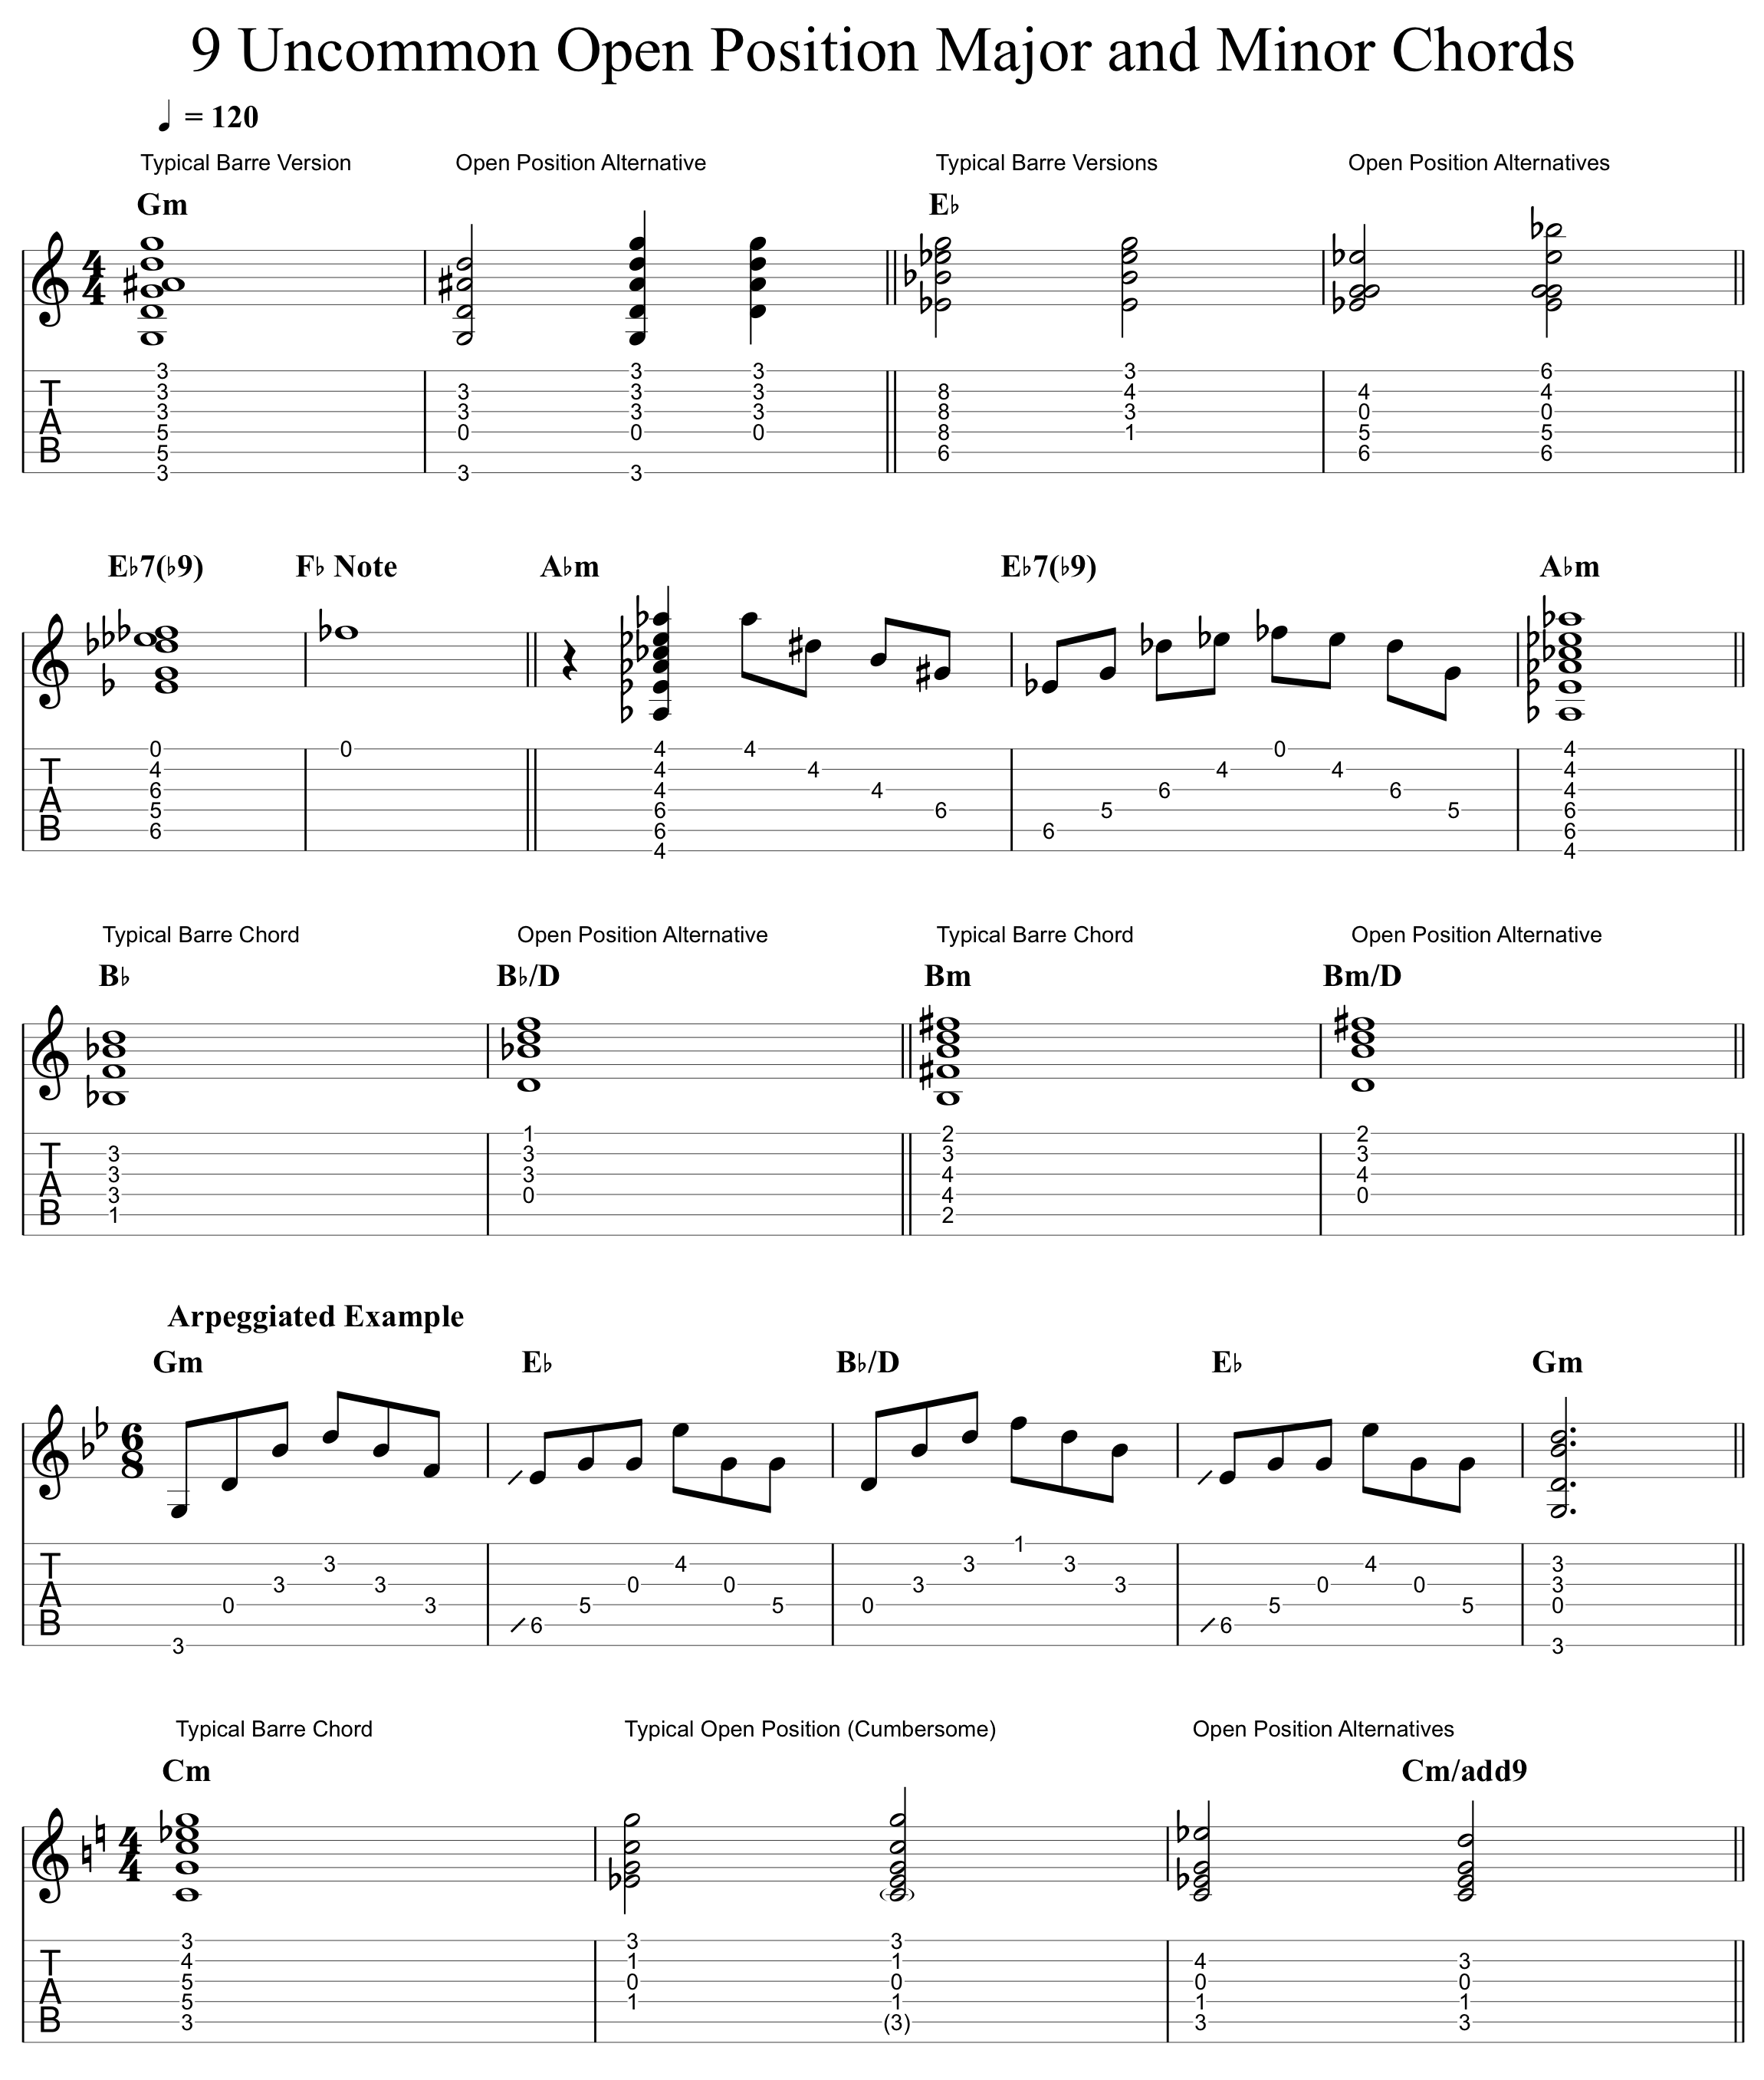
There are certain major and minor chords that are typically played as barre chords that have great open position style alternative voicings. In this lesson, we’re going to explore 9 of these uncommon voicings and how they can be used. Click the link below to see the full video.

This lesson is geared towards the guitar player who knows the typical open position major and minor chords, and maybe even 7th chords, and is looking to expand their chord vocabulary. This lesson will…

  • Expand one’s chord vocabulary
  • Give open position alternatives to chords that are typically played as barre chords
  • Improve one’s muting technique
  • Show creative solutions to playing a chord progression
  • Provide some easier open position versions of barre chords for players that have yet to learn or are new to barre chords.

Before you tackle this lesson, you should already know these chords.

A, C, D, E, G, Am, Dm, and Em

While it’s not necessary to know your open position Dominant 7th chords (or just 7th chords, for short), I suggest that you learn those first before getting into this lesson. Those chords are…

A7, B7, C7, D7, E7, and G7

The 9 uncommon open position major and minor chords are Gm, Eb, Bb, Bm, Cm, C#m, F#m, B, and G#m. Here they are separated into major and minor groups.

Major: Bb, B, Eb

Minor: Bm, Cm, C#m, F#m, Gm, G#m

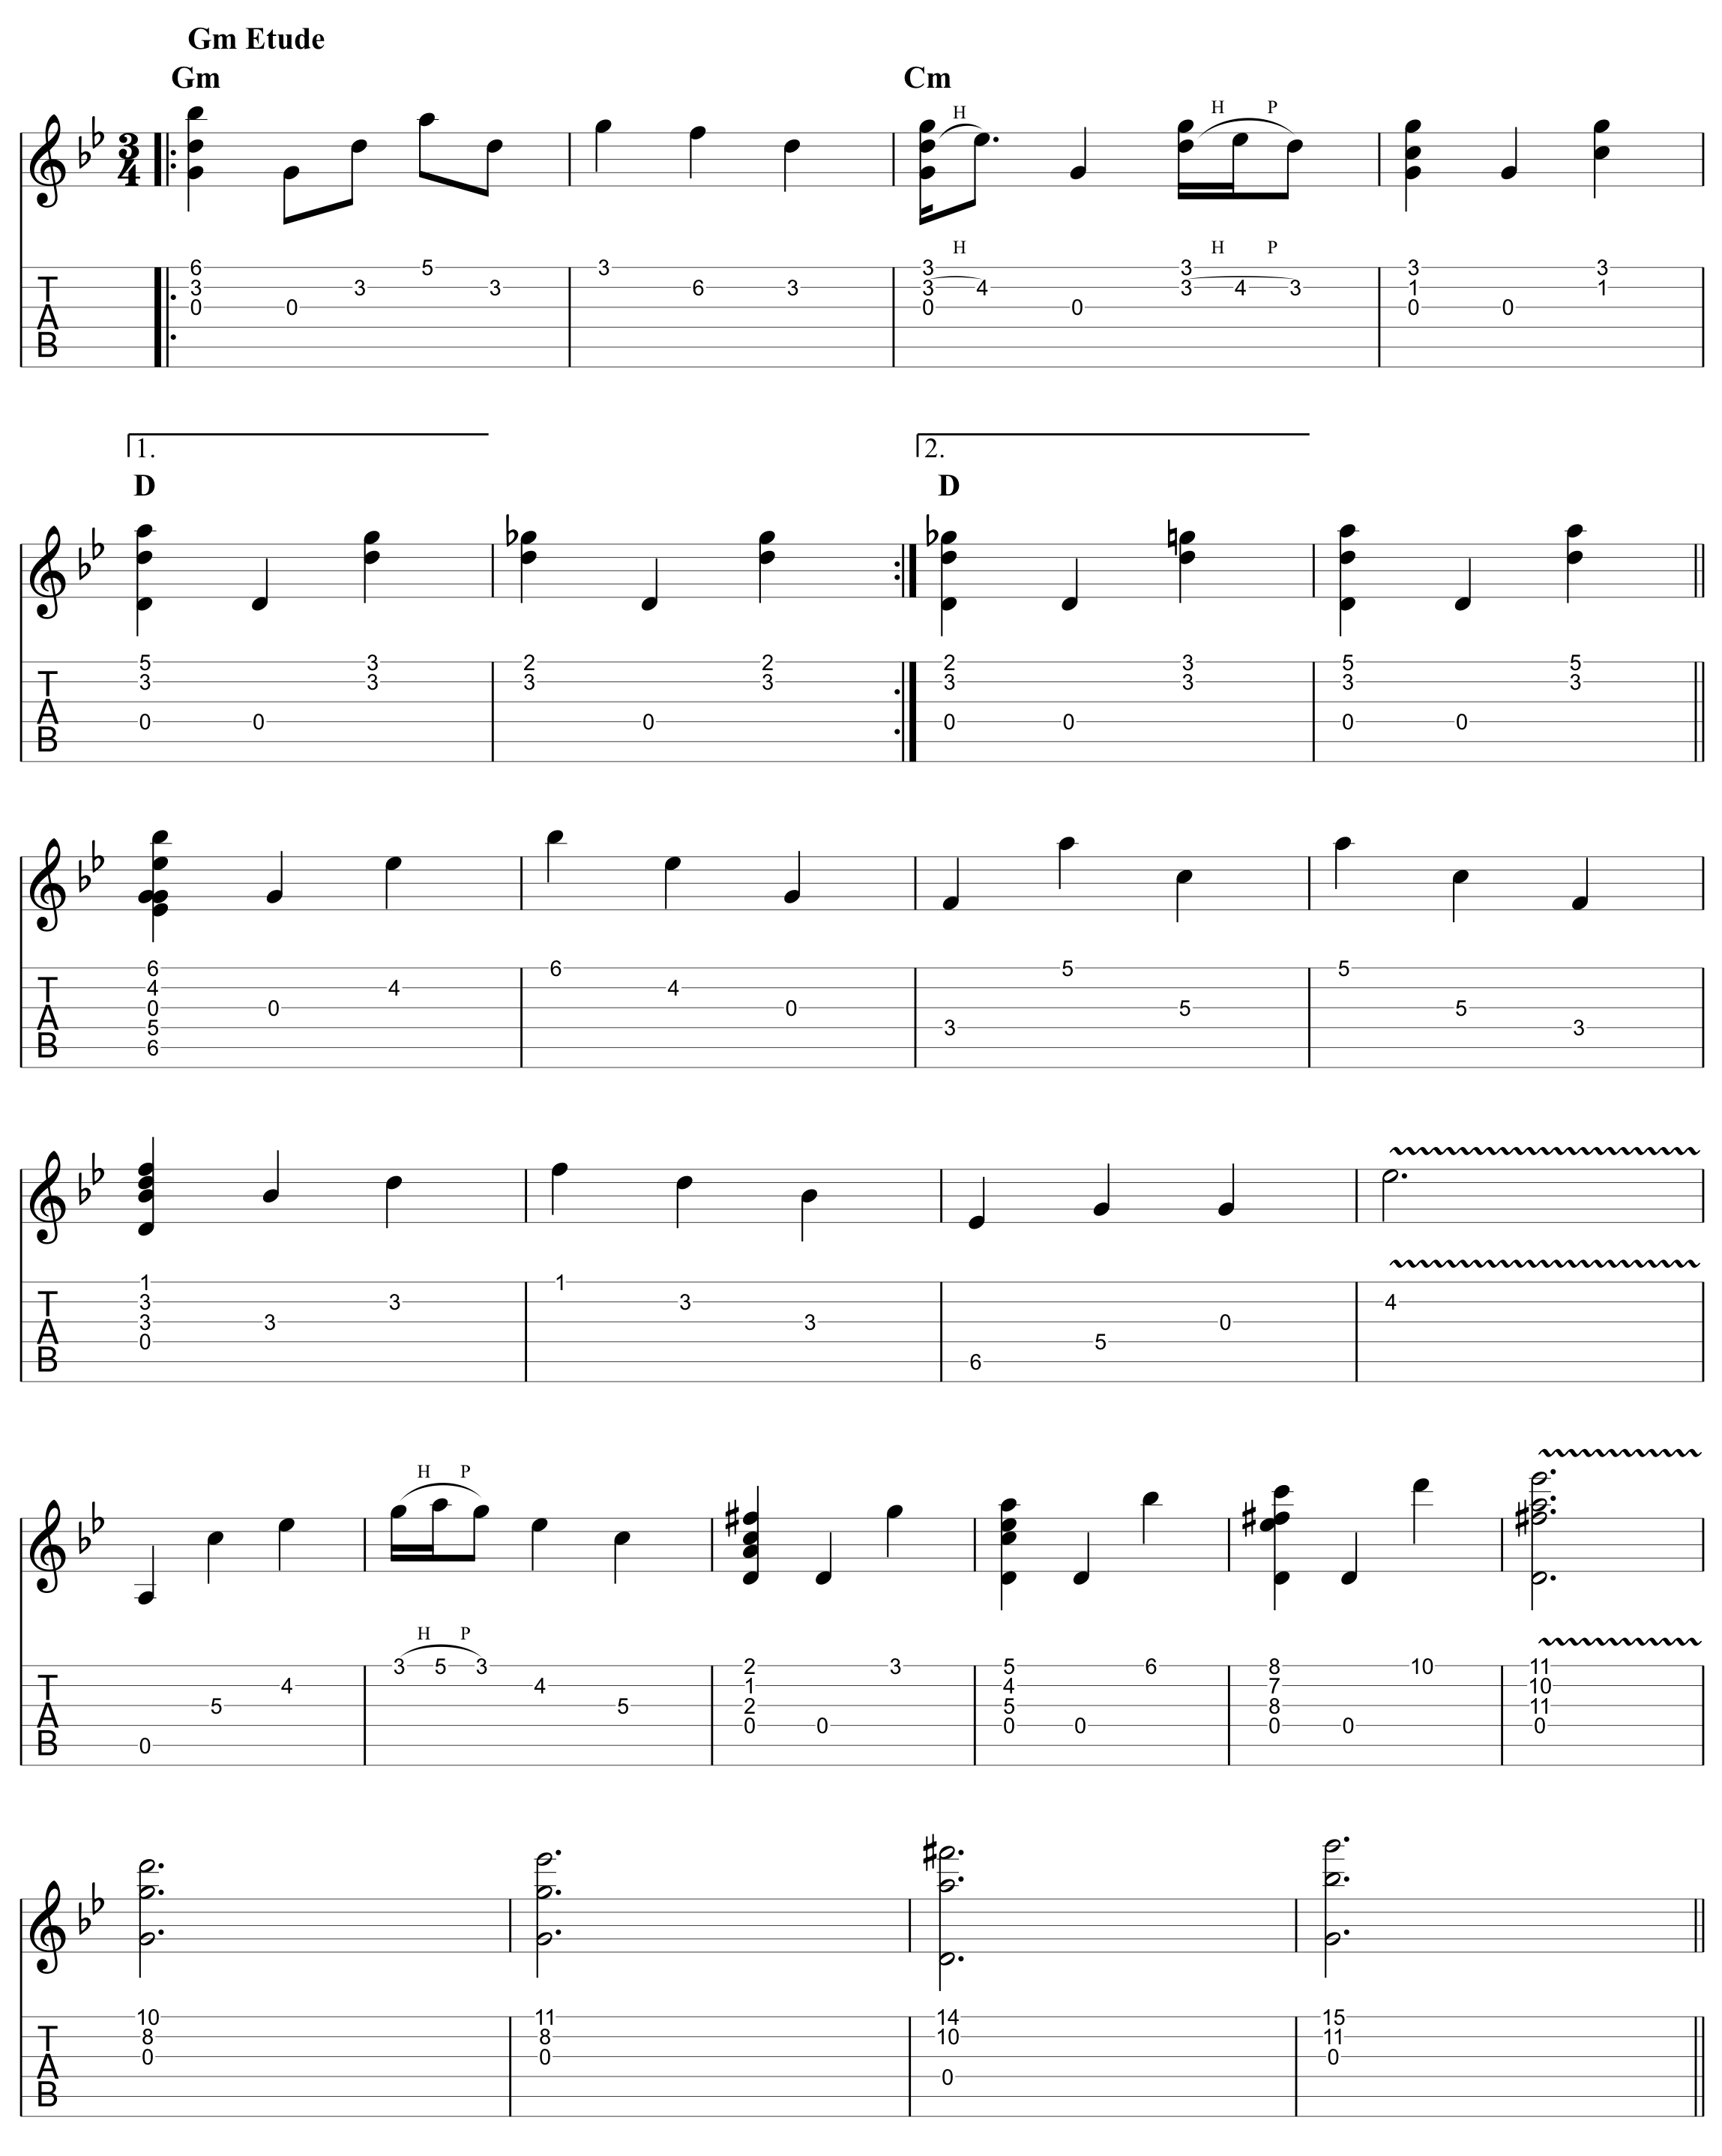
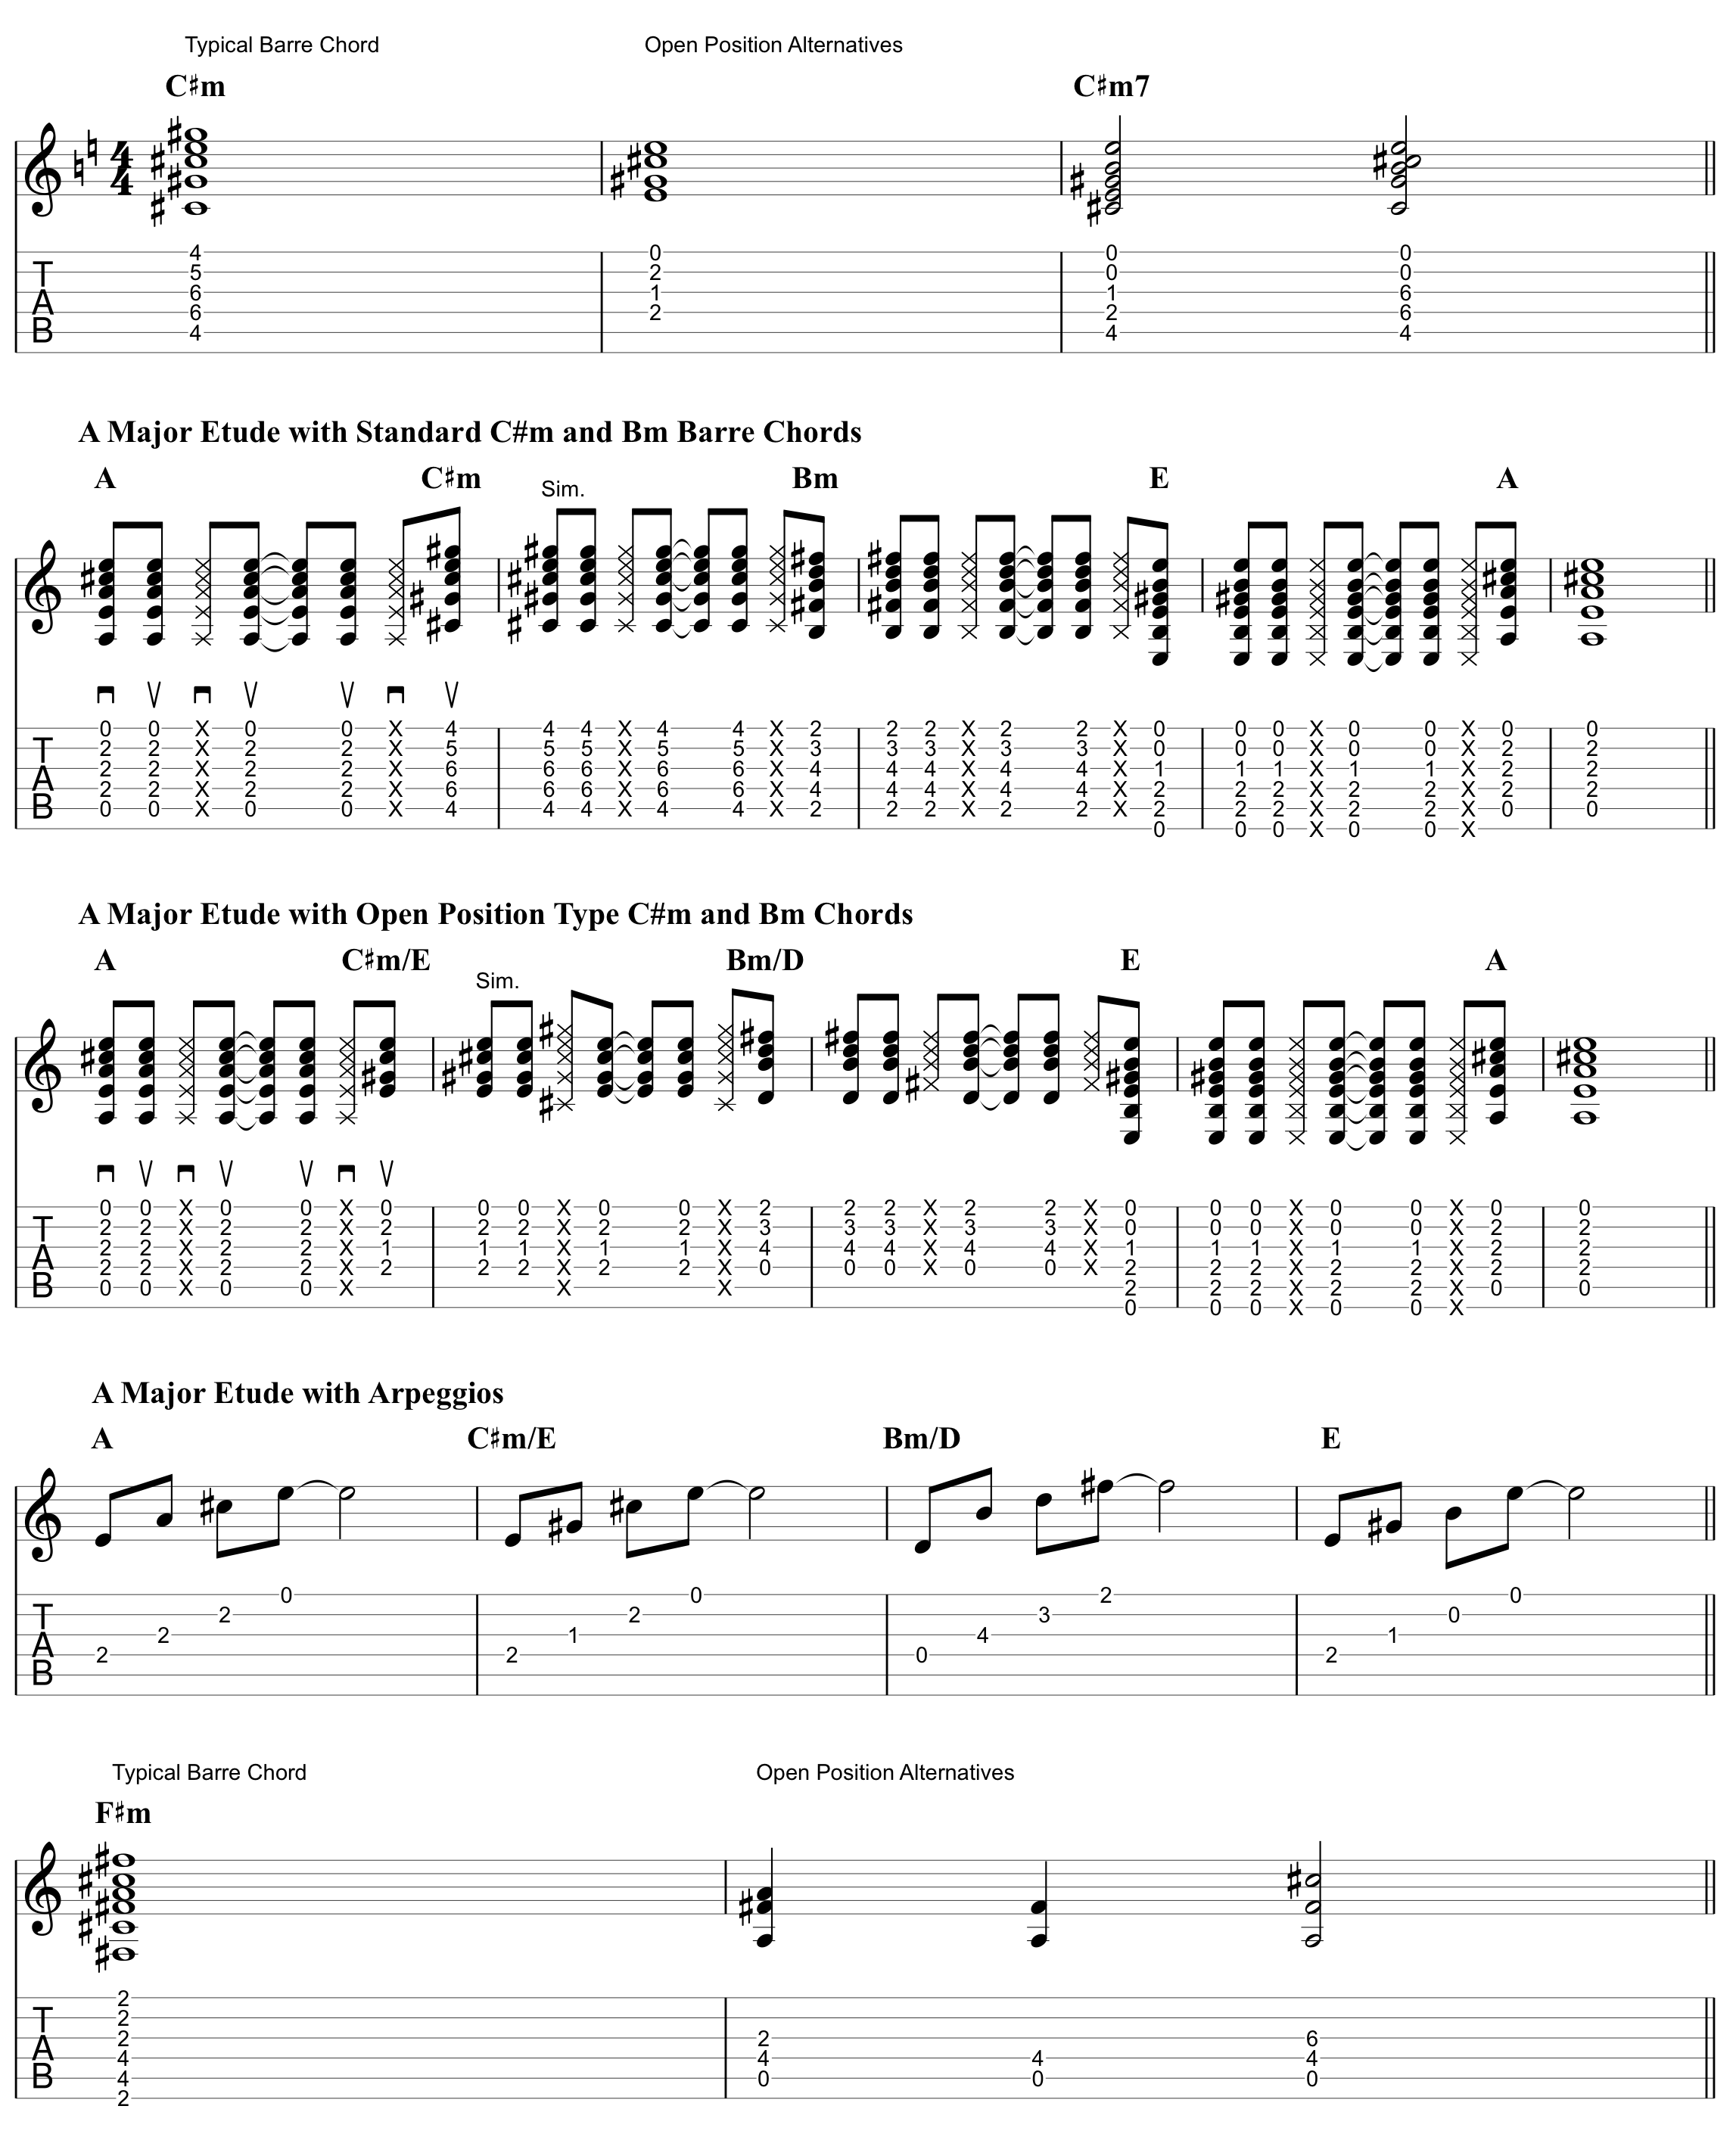
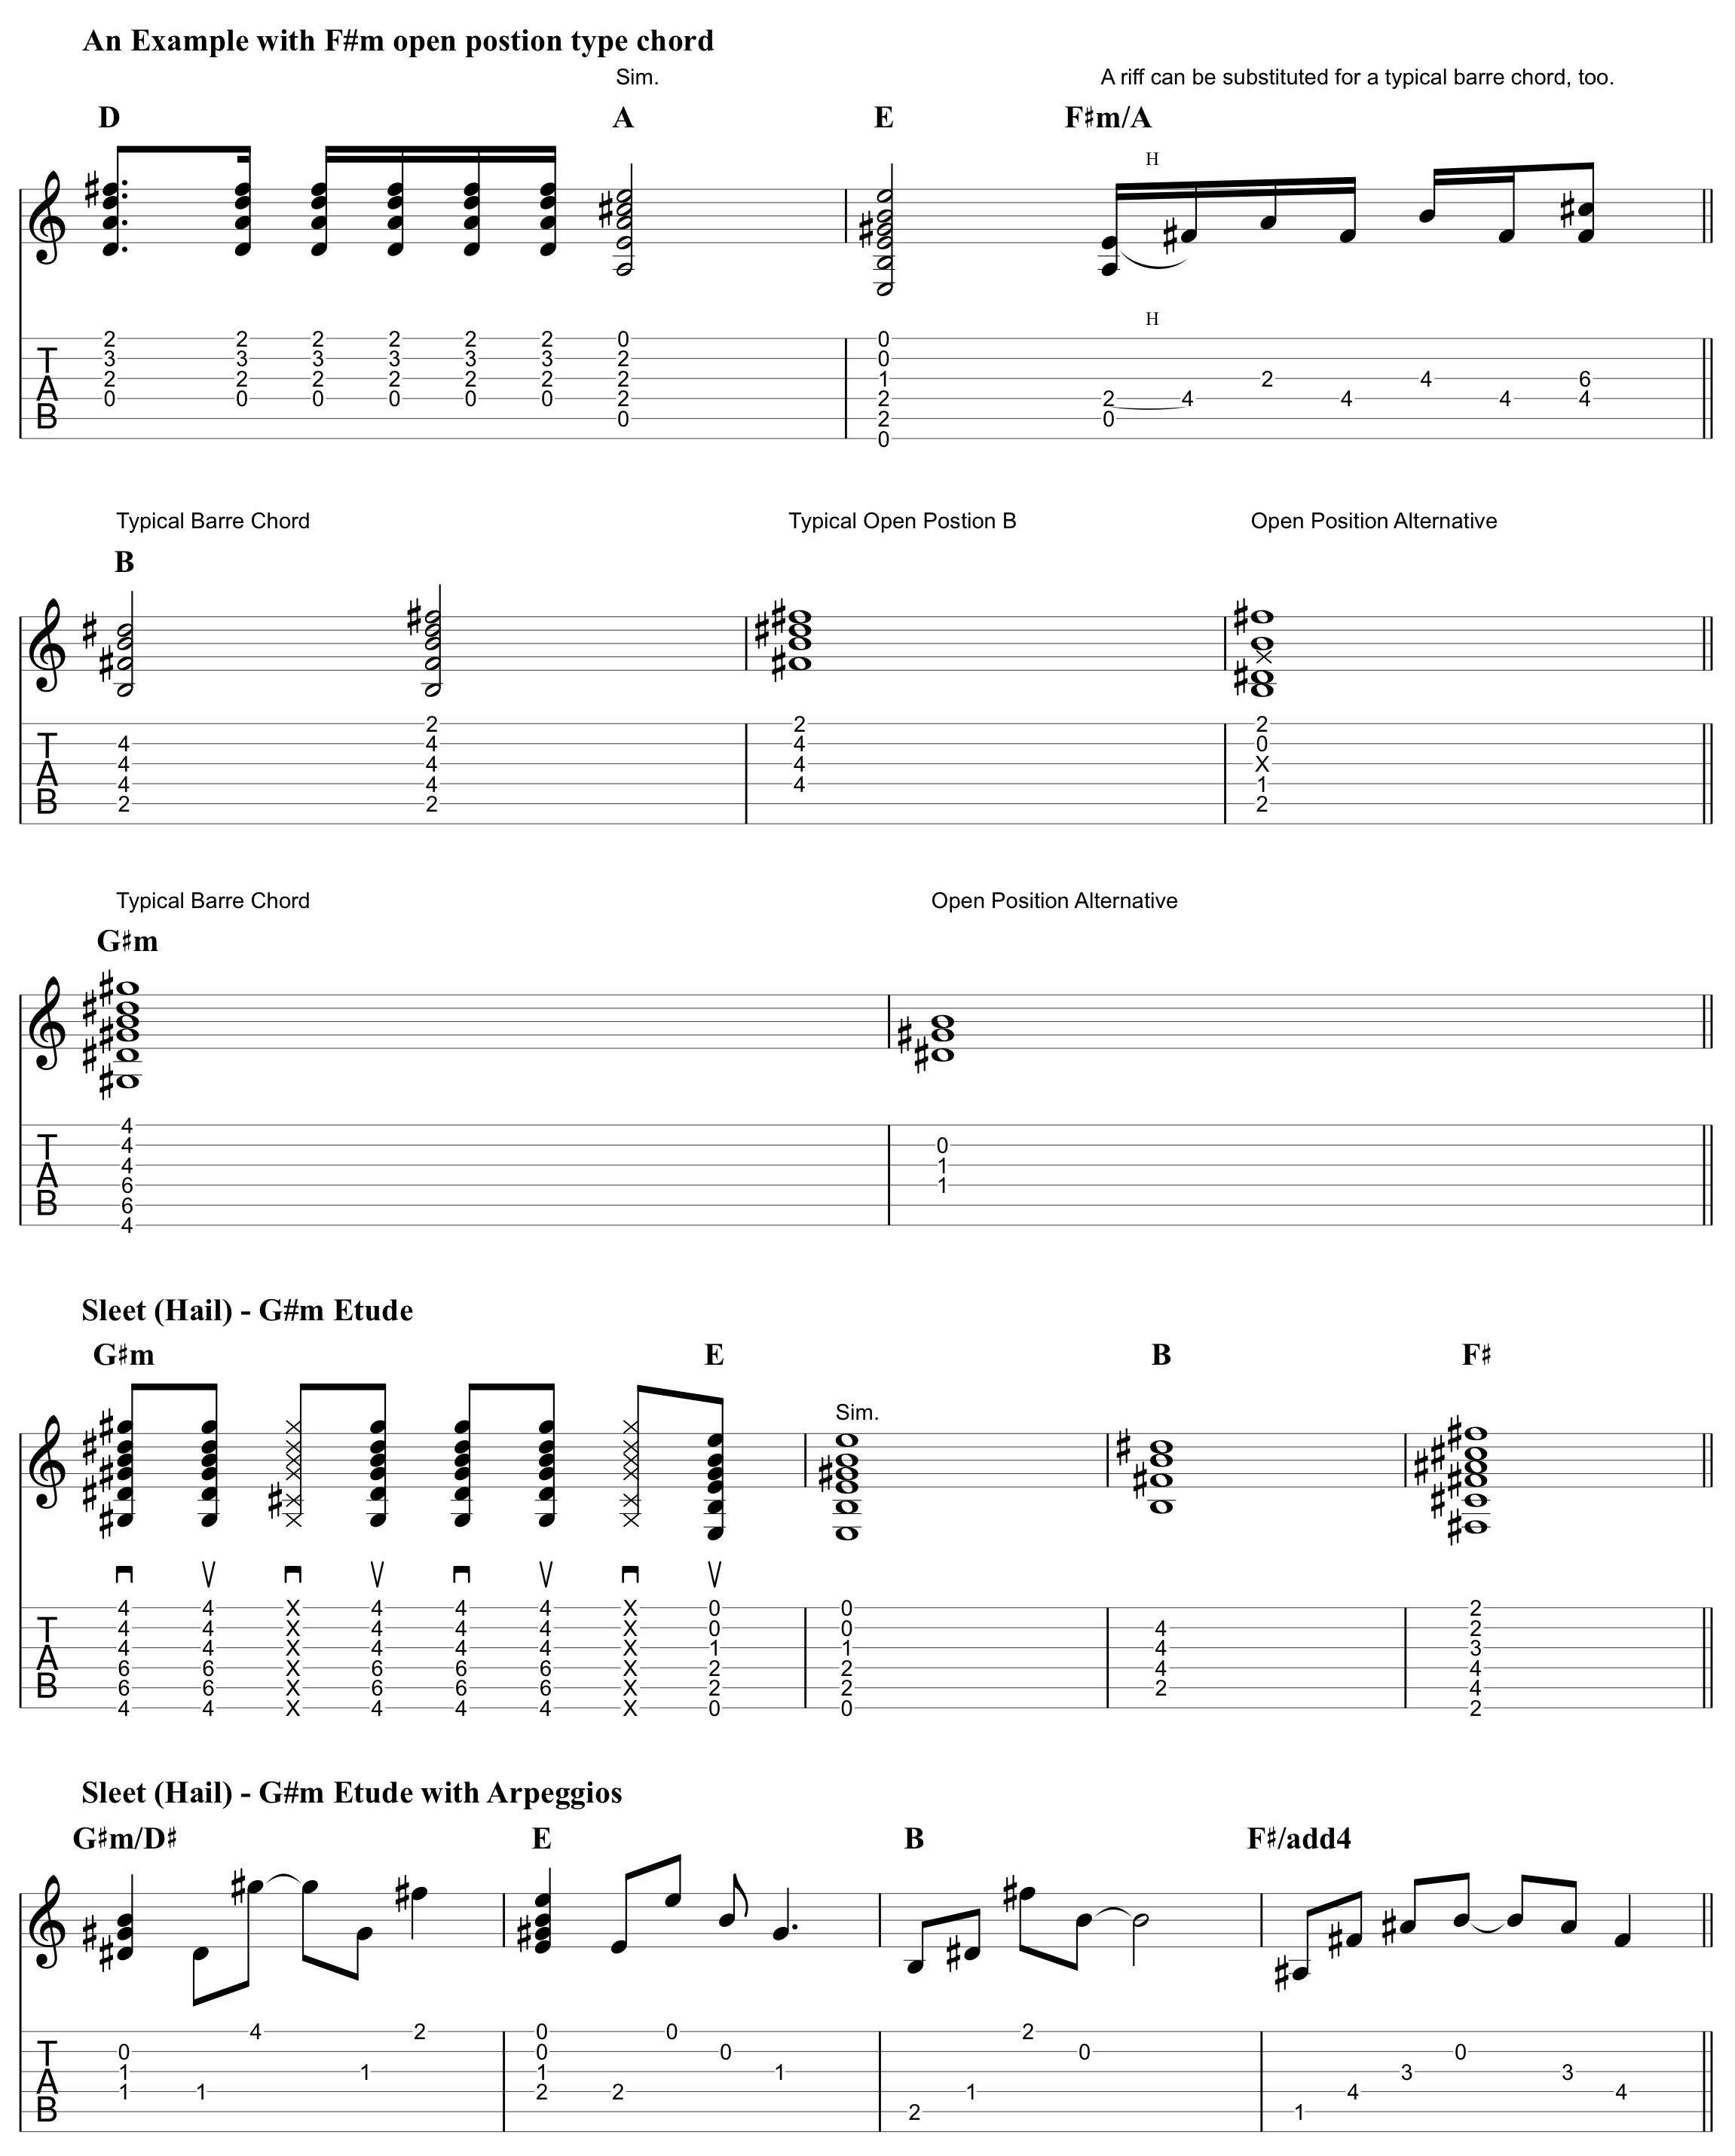
Here is the notation to follow along with the lesson video.

There are a couple of these that have multiple names. G#m can also be Abm, Bb could technically be A#, C#m could be Dbm, and F#m could be Gbm.

This lesson can serve as a stop gap for students who are new to barre chords and need one of these chords to play a song. These voicings are also very useful after you learn your barre chords. Many of these have become my go-to voicings for strumming rather than the typical barre chords. Experiment, have fun, and happy practicing!

Lessons

Practice Tips: Use a Music Stand

A good solid music stand is a valuable companion in learning the guitar. It’s an often overlooked piece of equipment, but utilizing one makes the serious study and learning of guitar much more manageable.


The highly dubious beginner’s music stand.


The beginner gray, fold up stand only exists because it is cheap. That’s it. This is for people new to learning music or kids who may not commit to learning music and don’t want to spend a lot of money on a stand, so this flimsy excuse for a stand exists. This one is fine to start with, but the build is often cheap, and it usually can only hold a sheet or two at a time. If you practice with a method book, this stand will fall over on you. This is fine if you are just getting your feet wet with a musical instrument, but should be upgraded as soon as possible.

“Without some sort of music stand, you are almost guaranteed to be hunched over a table or a chair while practicing, which means you’ll likely be uncomfortable and have bad posture – both things that will hinder not only your practice, but potentially your health.”

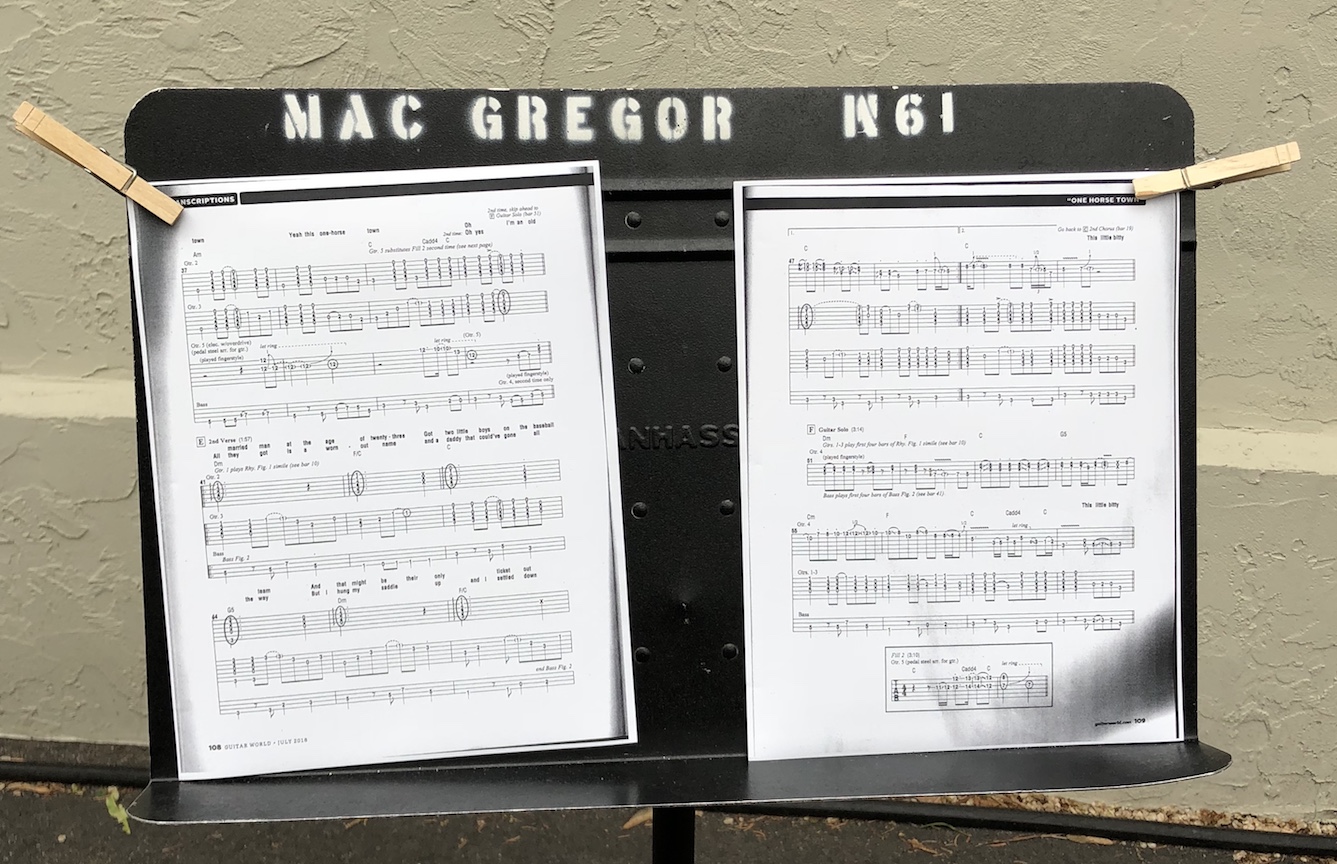
The best course of action is to save your pennies and buy a Manhasset stand. It is said there are two things that will will survive in a nuclear holocaust, cockroaches and Twinkies. I believe we must add  Manhasset stands to that list. They are sturdy, reliable, and built to withstand a bomb blast or whatever you throw at it.

The indestructible Manhasset stand!

I use the Manhasset stands for gigs all the time. Their solid construction ensures that even if the strongest winds blow or Hades himself shows up from the underworld that the music I’m playing from will be in good shape. (BONUS TIP! Clothesline hooks come in handy for outdoor gigs where the wind is blowing as well).

Clothesline hooks can save an outdoor gig on a windy day, and yes, it was actually windy when I took this photo!

I recently picked up a Desca Presto travel stand. This stand is seriously cool. It is designed to be as durable and sturdy as a Manhasset stand, but it’s able to fold down into a small manageable size for ease of carry. I don’t typically need this stand for GB gigs since stands are often times provided, but the Desca Presto has come in handy for one-off gigs, out of town wedding gigs, and teaching remotely.

The portable Desca Presto stand.

I teach many of my students out of Chanhassen High School, and the teachers are gracious enough to let me borrow a music stand when I come to teach. However, the stands are on the other side of the building from where I teach, and it is a huge school, meaning it takes a lot of extra time to go get a stand and bring it back. Time is often something I don’t have a lot of by the time I get to work, so the compact Desca Presto has been a perfect solution for teaching away from my home studio.


The Desca Presto stand folds up into this small, easy to carry box.

So why do we need a music stand? This simple tool is where your practice hub will be. You can keep your practice material, pencil, spare picks, or whatever you need to learn and play the music that you want to. Without some sort of music stand, you are almost guaranteed to be hunched over a table or a chair while practicing, which means you’ll likely be uncomfortable and have bad posture – both things that will hinder not only your practice, but potentially your health.


It is fine and highly recommended that you learn things by ear, so you won’t need a music stand for that. However, at some point in your musical journey, you might want to crack open a guitar book or you’ll be handed a piece of music to play, so why not have that music stand ready so you can practice efficiently and comfortably? It’s not an exciting equipment purchase like a guitar or an amp, but it is an investment that will transform your practice and playing dramatically for the better.

What music stand do you use? Do you have an alternate solution or idea for a music stand or do you forgo them altogether?

If you don’t have a high quality music stand, you can buy a Manhasset stand here.

Manhasset Stand

If you need a portable stand that breaks down like a Transformer, you can buy a Desca Presto here.

Desca Presto Stand

If you have any thoughts, feelings, snide remarks, Shakespearean insults, questions, comments or suggestions for topics then please let me know. Leave a comment below or send me an e-mail.

You can also connect with me via Instagram, Twitter, and/or Facebook to keep up to date with new lessons, articles, and content.


Lessons, Music Theory, Semeron

A Day in July: Minor Pentatonic Exercise

Semeron circa 2012. JR is on the left, and that’s me on the right. We’re playing guitarmonies, of course!

Today we’re going to explore playing a minor pentatonic melody in different positions to better learn the fretboard.

What you’ll learn

  • How to play a Minor Pentatonic scale and melody in several positions
  • How to find a single note on every string
  • How to play a Minor Pentatonic scale and melody on one string
  • The importance of space and breath in a melody

This melody comes from my band Semeron’s unreleased song, “A Day in July.” JR Westberg, the other guitarist in the band, has a knack for coming up with simple, catchy melodies. This often comes first to which I will come up with harmony for it, as I did on this song.

It’s one thing to practice a scale all over the neck, but quite another to play a melody all over the neck.

One day while I was rehearsing “A Day in July,” I decided to learn and jam on JR’s part for fun. It was so much fun, that I naturally started playing it all over the neck and noticed how great of an exercise it would be for my students. It’s one thing to practice a scale all over the neck, but quite another to play a melody all over the neck. While scales can sometimes be a bit tedious, playing melodies tends to be more interesting and enjoyable.

This melody uses the B Minor Pentatonic Scale. One reason this melody works is space and breath. Notice that in measure 8 of the melody, he plays a long note which leaves space. It’s important to remember that we don’t always have to fill every moment with a ton of notes and to leave room for our band members. “Let some things go by” as Thelonious Monk would say.

The way the melody is phrased is very musical as well. The first measure is essentially just the B Minor Pentatonic scale ascending, but the use of slides and variety of rhythm makes this melody work. Try playing both measures in Exercise 1 and you should find that the 2nd measure sounds much more musical. It’s a great demonstration on how to turn a scale into music!

A Day in July Exercise 1

Exercise 2 is the B minor pentatonic scale in the position that the original melody is played.

Semeron A Day in July Minor Pentatonic Ex2

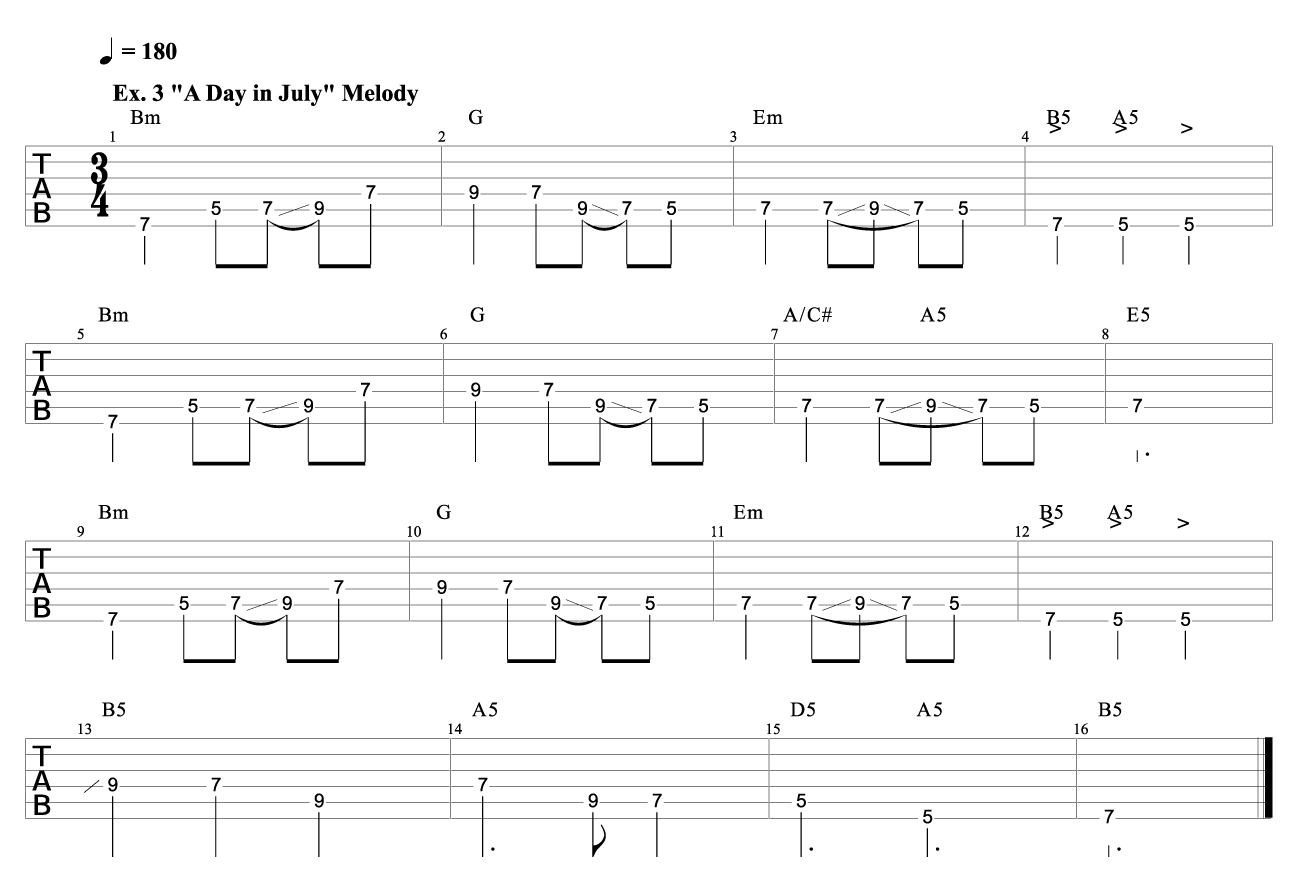
Exercise 3 is “The Day in July Exercise.” I changed the original melody at the end to keep it within the B minor pentatonic scale for the purposes of this lesson.

Semeron A Day in July Minor Pentatonic Ex 3

JR can play the “A Day in July” melody all over the neck, and now you can learn how too!

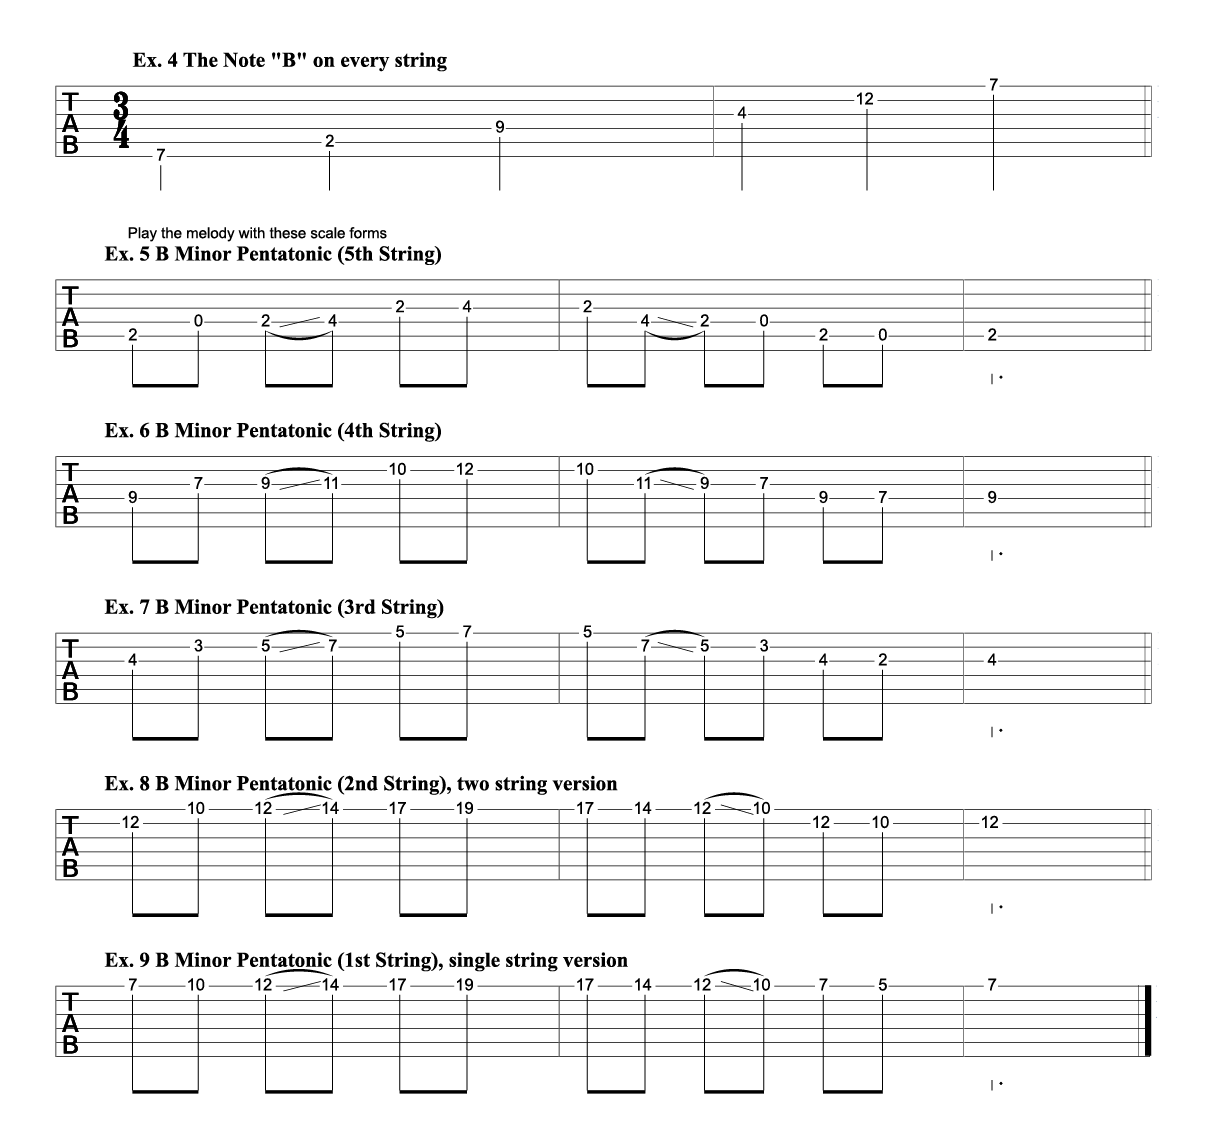
Exercise 4 is the note B on every string. This will help you identify the root note of the exercise as well as provide the starting point for the melody as you move it around the fretboard.

Exercises 5-9 show a few suggested ways of playing the B minor pentatonic scale from different strings and positions. Once you’re familiar with the original melody, try playing it in these new positions.

Ex. 9 demonstrates the scale on a single string on the high E string. The position shifts might be a bit tricky at first, but playing this way often yields great results in fretboard knowledge and can lead to more variety in phrasing. Once you get this down on the high E string, you can try playing it on other single strings as well.

I hoped you enjoyed checking out this melody and playing it all over the neck. Keep practicing, keep it fun, and see you next time!

Lessons, Music in the Media

Thelonious Monk’s Handwritten Advice for Playing a Gig

Thelonious Monk at Minton’s Playhouse, New York, 1947

This list of tips for playing a gig was written by none other than legendary jazz pianist Thelonious Monk. This handwritten note is a fascinating look into some of Monk’s thoughts on playing jazz, as well as practical advice for playing gigs.

A handwritten list of advice from jazz legend Thelonious Monk

There are a lot of great gems here, but a few of my favorites include;

  • Just because you’re not the drummer, doesn’t mean you don’t have to keep time.
  • Stay in shape! Sometimes a musician waits for a gig, and when it comes, he’s out of shape and can’t make it.
  • What should we wear tonight? Sharp as possible!

So, work on keeping time (practice with a metronome!), practice consistently even when you don’t have a gig coming up, and dress sharp! Amazingly simple, but powerful advice.

For a small taste of Monk’s distinctive style, listen to his tune “Straight, No Chaser.”

Now try playing the *head for “Straight, No Chaser,” notated below. Start slowly, and pay attention to the rhythms and timing. Also notice how he makes use of space. Monk’s advice from the above sheet comes to mind.

    “Don’t play everything (or every time); Let some things go by. Some music just imagined. What you don’t play can be more important that what you do.”

Have fun, keep practicing, and remember to “lift the bandstand!”

 “Straight No Chaser” Standard Notation and Tab

*”Head” is a jazz term for the melody of a tune.